
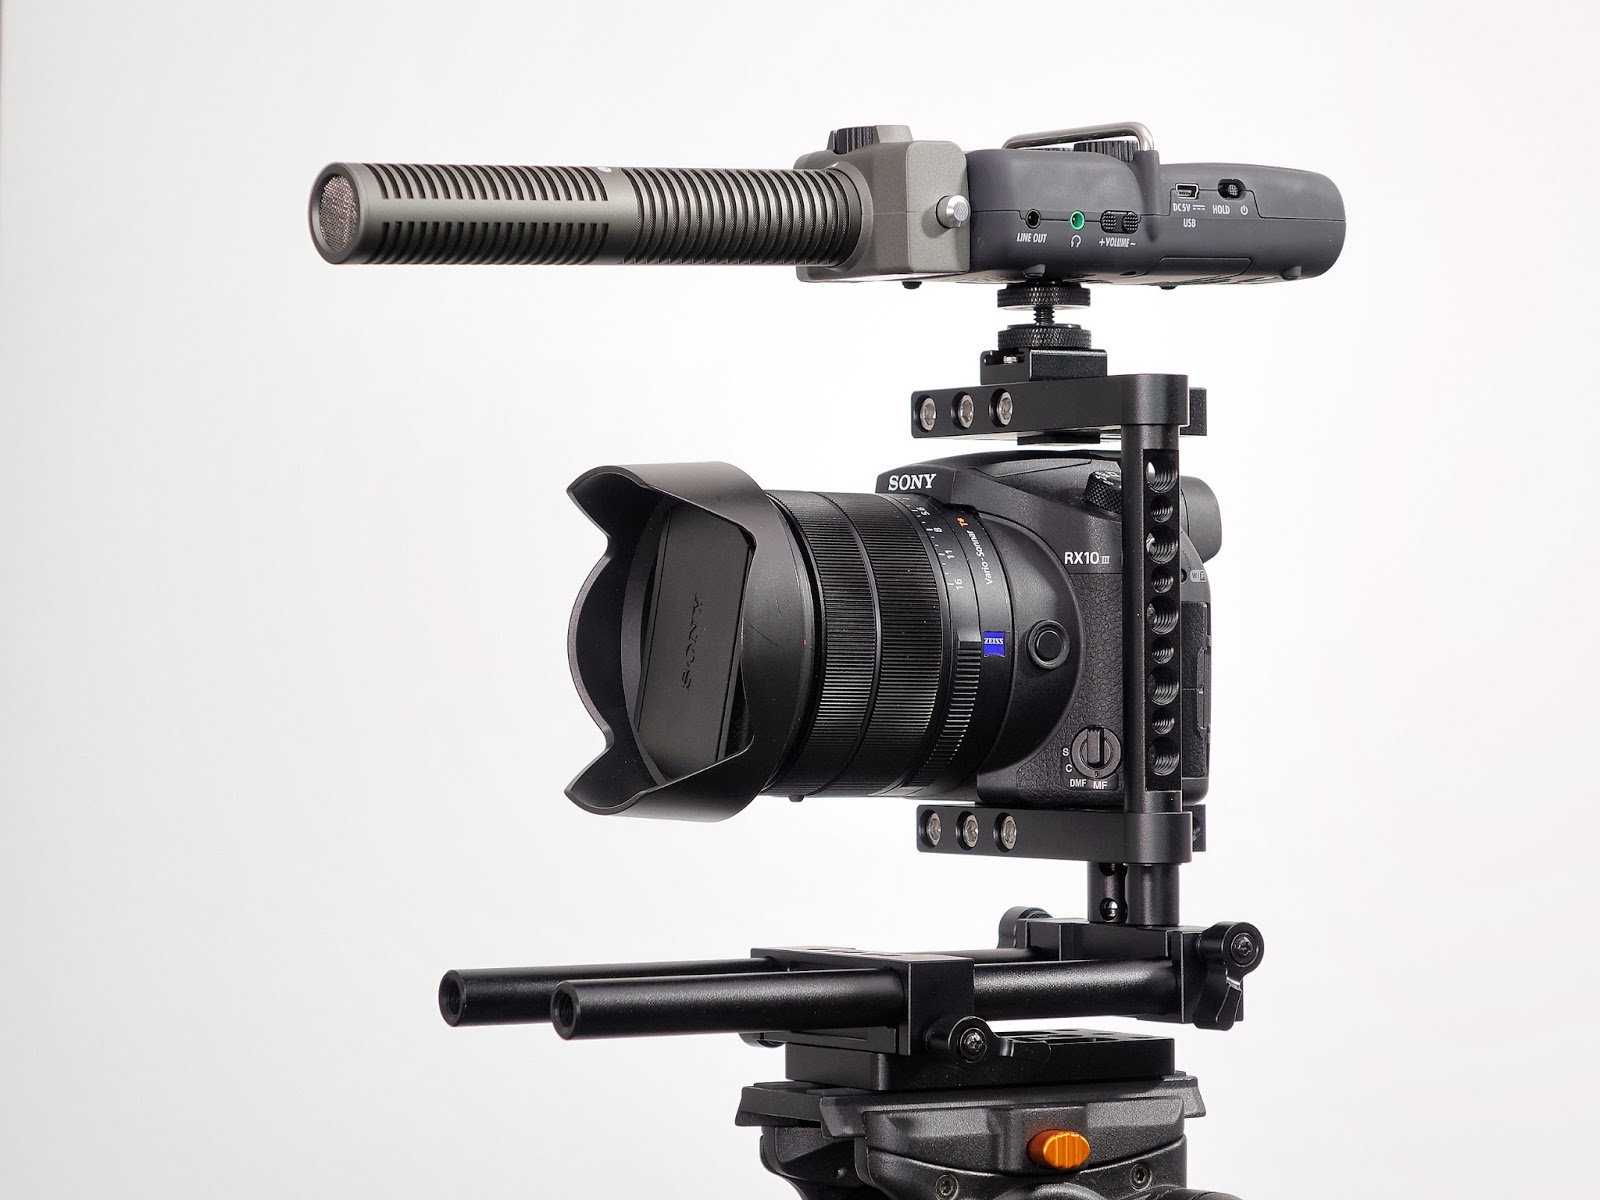
Sony RX10-3 show in a Camvate Cage Rig. Providing vital mounting points for all the crap you need to make small camera video production workable. Photo: ©2017 Kirk Tuck, courtesy: The Visual Science Lab.
What is a "cage" and why might I need one? Still cameras don't need cages...unless you are laboring under the idea that your still camera is also a potent video production camera which you can use to create video art and also to produce video programs for which you get paid. Then... you might start considering a camera cage. Basically, a cage provides a metal "exo-skeleton" for your camera which protects it from some knocks and scratches but mostly (and most importantly) provides mounting points for all the junk that you are going to want to buy and hang off your camera in order to make nice video.
The cage I'm looking at in this blog post also provides a basic rail system that, in addition to a bare bones cage, also gives you mounting points for follow focus attachments and a compendium shade or matte box. The distilled down cage is an assemblage of metal parts that fit around your camera and provide 1/4 inch and 3/8ths inch threaded mounting points. You use these to attach: external audio recorders, external microphones (though you are better off getting the microphone off the camera and closer to your subject...). monitors, pre-amplifiers and mixers. Or some combination thereof.
If you take a Sony RX10iii as an example there are only two mounting points on the camera itself. One is the tripod mount on the bottom of the camera and the second is the hot shoe on top of the camera. But the hot shoe is right above the EVF and anything that sticks out over the EVF is going to get in your way, if you use the EVF to focus and compose. The hot shoe might also put the piece of external equipment that you need to use in just the wrong position to be helpful... The cage provides a better solution. (more below). >

Photo: ©2017 Kirk Tuck, courtesy: The Visual Science Lab.
I recently bought SmallRig (brand) cages for both the Sony A7Rii and the a6300. Both of those cages were custom designed for those specific cameras and they fit snugly around the cameras giving you a very discreet visual profile. Adding a cage to the a6300 transformed that camera from a pain-in-the-ass (handling) camera, with great image quality and super video, into a much more ergonomic shooting package. The naked a6300 is too small to hold well and, if mounted on a tripod the only place to put stuff is in the hot shoe. Seems dicey to me to add much weight to such a small connection point, especially since there is so little "real estate" on top of that camera to play with. The SmallRig cage allowed me to put a Beachtek audio interface on one side while attaching a monitor to the top area of the camera. The monitor allows a much better viewing experience than the smaller screen or poorly light shielded EVF while also giving us a headphone jack with which to monitor our audio. Even with both of those devices connected there is still at least one more available mounting point which I could use to attach a stereo microphone for ambiance.
The A7Rii is a much bigger camera (it's all relative) so the cage for it is more spacious and gives me lots of room to make attachments. In addition to a digital audio recorder and external monitor is seems to me to be a good idea to also attach a big, lithium ion phone charger battery which could power the camera through the USB port for many hours.
After many good experiences using cages on both of the above cameras I knew I wanted to find a good one for the RX10iii but I couldn't find one made specifically for that model. Bummer. I was going to order a generic model meant for a wide range of medium-sized cameras when I came across this one (see all photos) from a different company. The products looked similar to the ones from SmallRig but offered the rail system, in addition to the basic cage, for a price of around $120. I read the reviews on Amazon.com and ordered one, knowing that if it wasn't up to my standards I could easily return it.
(more below). >

Photo: ©2017 Kirk Tuck, courtesy: The Visual Science Lab.
The product camera yesterday and I couldn't be happier with the flexibility and quality of the system. It came well packaged and the maker provided some extras that were most appreciated. The system is meant to be adapted to many different consumer camera models so it stands to reason that one can do a fair bit of customization.
For instance, there is a bar that attaches the top plate to the plate on which the camera sits. You can adjust the bar at either end to fine tune the height of the top plate to the top of the camera. Some people might want a snug fit while others might want more space in which to get their fingers on the camera to operate controls. If the bar is too short, fear not! the package comes with a second bar that is about .75 inches taller. I ended up using the shorter bar with the RX10iii (which is not a very small camera) but I would need to use the longer bar if I were to use the rig with something like a Nikon D5 or a Fuji XT(xx) with a battery grip. Nice to have it included in the package. ..
(more below). >

Photo: ©2017 Kirk Tuck, courtesy: The Visual Science Lab.
While the "fly-by-wire" focusing system of the RX10iii doesn't lend itself to the use of a follow focus the rail system is great to have anyway. It creates several more attachment points for things like bellows shades and matte boxes which can help with some tricky film making. It can be used to balance the weight distribution on a tripod. It also looks pretty cool...
(yes, more below). >

Photo: ©2017 Kirk Tuck, courtesy: The Visual Science Lab.
I am happy with the products from both companies and I'm happy to leave the cages on the cameras. In this way I can outfit the cages with the gear I need for specific video shoots before I leave the studio and then dump them into a Manfrotto video bag for safe keeping. Once I get to my location I can put my rig up on a tripod, connect the cables, and be ready to shoot. Even the best rigs won't be as fast and carefree to use as a dedicated video camera but even in that arena (ENG) I see many operators festoon FS-7 and FS-5 cameras with so much junk that you'd be hard pressed to use the cameras quickly, or even handheld.

Photo: ©2017 Kirk Tuck, courtesy: The Visual Science Lab.

Photo: ©2017 Kirk Tuck, courtesy: The Visual Science Lab.
On every shoot I've ever done I learn something new. I learn some way to do something better or more efficiently. What I learned on recent assignments, which skewed heavily to video, is that having the audio recorder or other tool in the right place in order to reach the controls easily (and without adding unwanted vibration to the overall rig) is critical, and that a good cage, with lots of attachment points, can make a big difference in your overall effectiveness as a camera operator. A bit of customization can go a long way. Now to see how the rig works on a shoulder mount for an upcoming documentary. More learning to come. I just hope it's not too painful...
No comments:
Post a Comment